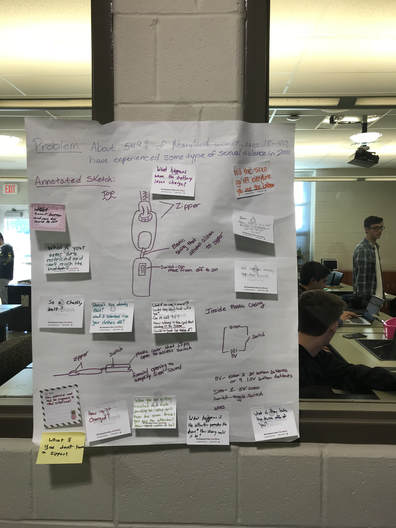
additional documentation
|
|
building procedures and pricing
Materials/Pricing -
2 Energizer Batteries CR2023 Lithium 3V ($1.84)
1 Active Piezo Buzzer Alarm 12mm Dia DC 5V 2 terminals ($0.54)
1 uxcell Black Plastic Battery Holder for 2x3V CR2023 Coin Button Cell ($1.94)
2.8 grams of PLA Plastic ($2.80)
8 inches of Stretch Cord ($0.04)
1 Hot Glue Stick($0.17)
2 Command Picture Hanging Strip ($0.54)
Total Cost=$7.87
Tools and Equipment -
3D Printer
Autodesk Inventor
Soldering Iron
Hot Glue Gun
Building Steps-
1. Download Part 1 and Part 2 Autodesk Inventor Files.
2. Use 3D printer to print Part 1 and Part 2 Autodesk Inventor Files.
3. Place 2 Energizer CR2023 batteries into Uxcell Battery holder, following specified +/- flow instructions, per the battery holder.
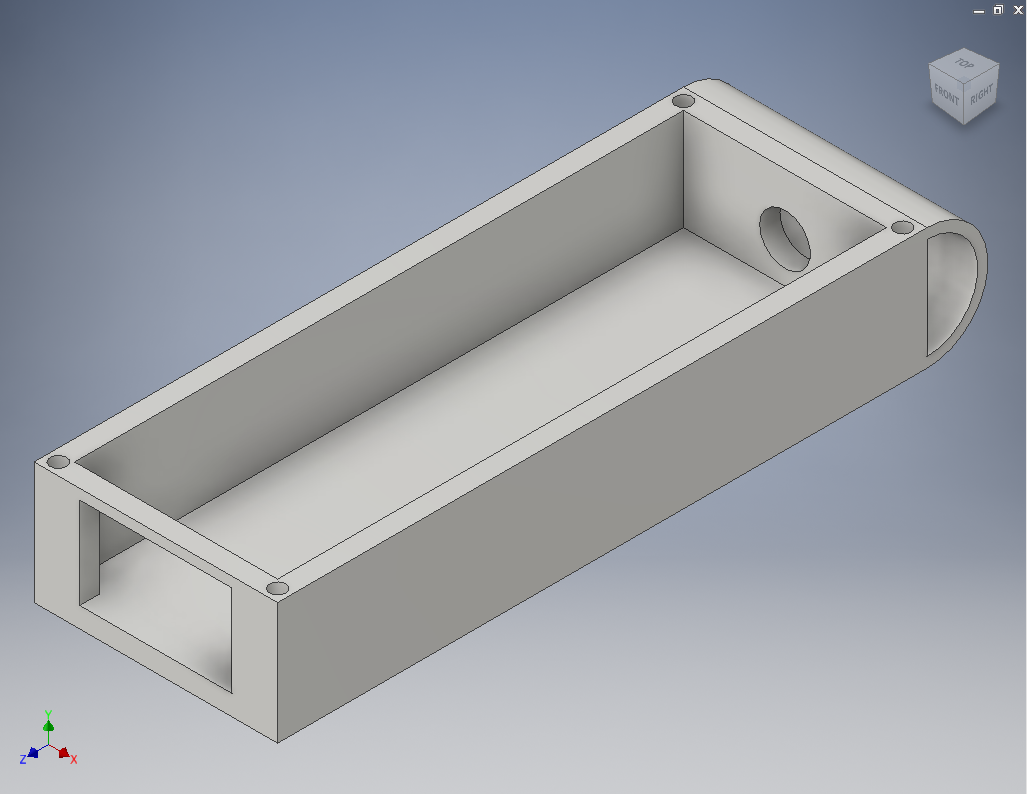
4. Close the Battery holder and place it in the larger compartment of the 3D printed part 1 piece.
5. Holding the wires attached to the Battery Holder taunt, hot glue the wires to the bottom, non-opening side of the battery holder.
6. Hot glue the Battery Holder to the bottom interior of the 3D printed Part 1, keeping the flat, short, side edge of the Battery Holder flush to the flat, short, side edge of the 3D printed Part 1.
7. Solder the wires attached to the Battery Pack to the Piezo Buzzer Alarm terminals, with the positive(red) wire soldered to the longer terminal, and the negative(black) wire soldered to the shorter terminal.
8. Hot glue the Piezo Buzzer Alarm flush to the short side of the Part 1, with the hole in Part 1 aligned with the Buzzer Alarm's sounding hole.
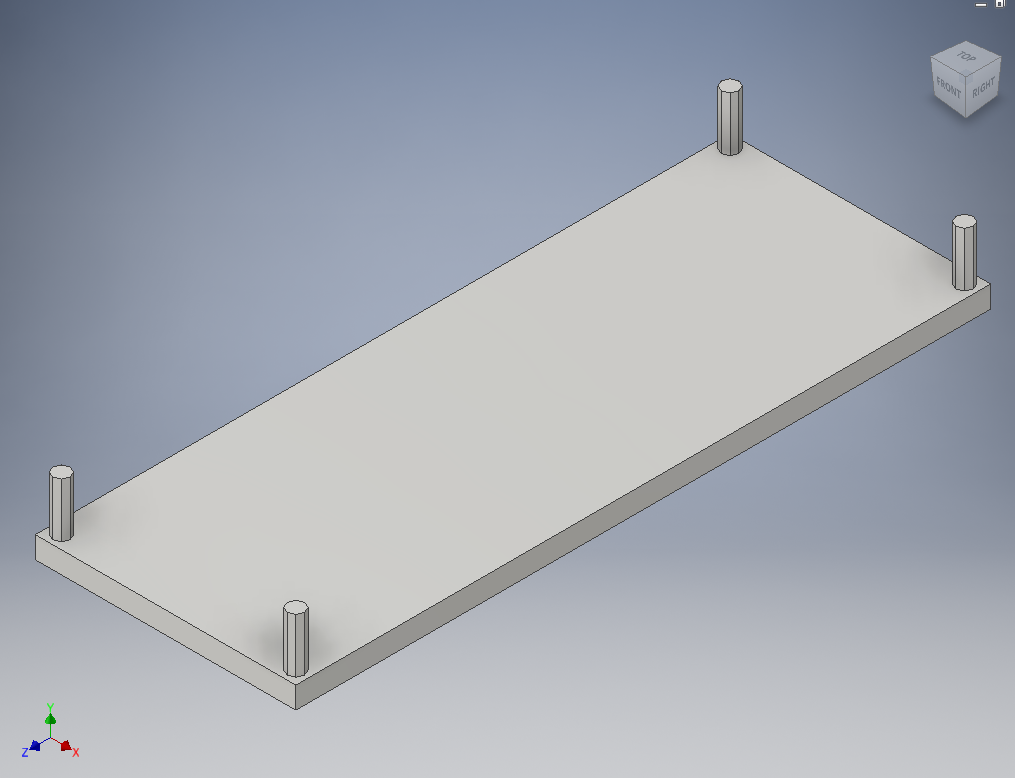
9. Attach Part 1 to Part 2 by aligning the extruded hexagons of part 2 with the 4 holes of part 1.
10. Measure the elastic string to 12 inches and cut.
11. Hot glue one end of the elastic string to one edge near the battery holder switch and the other to the opposite edge near the battery holder switch.
12. Cut off the 4 pegs on 3D printed Part 2.
13. Cut two command picture hanging strips into 4 pieces that measure .125 in x 2 in.
14. Attach two picture hanging strips to the long edges of 3D printed Part 1, one on each side.
15. Attach two picture hanging strips to the long edges of 3D printed Part 2, one on each side, placed to line up with the velcro strips on Part 1.
2 Energizer Batteries CR2023 Lithium 3V ($1.84)
1 Active Piezo Buzzer Alarm 12mm Dia DC 5V 2 terminals ($0.54)
1 uxcell Black Plastic Battery Holder for 2x3V CR2023 Coin Button Cell ($1.94)
2.8 grams of PLA Plastic ($2.80)
8 inches of Stretch Cord ($0.04)
1 Hot Glue Stick($0.17)
2 Command Picture Hanging Strip ($0.54)
Total Cost=$7.87
Tools and Equipment -
3D Printer
Autodesk Inventor
Soldering Iron
Hot Glue Gun
Building Steps-
1. Download Part 1 and Part 2 Autodesk Inventor Files.
2. Use 3D printer to print Part 1 and Part 2 Autodesk Inventor Files.
3. Place 2 Energizer CR2023 batteries into Uxcell Battery holder, following specified +/- flow instructions, per the battery holder.
4. Close the Battery holder and place it in the larger compartment of the 3D printed part 1 piece.
5. Holding the wires attached to the Battery Holder taunt, hot glue the wires to the bottom, non-opening side of the battery holder.
6. Hot glue the Battery Holder to the bottom interior of the 3D printed Part 1, keeping the flat, short, side edge of the Battery Holder flush to the flat, short, side edge of the 3D printed Part 1.
7. Solder the wires attached to the Battery Pack to the Piezo Buzzer Alarm terminals, with the positive(red) wire soldered to the longer terminal, and the negative(black) wire soldered to the shorter terminal.
8. Hot glue the Piezo Buzzer Alarm flush to the short side of the Part 1, with the hole in Part 1 aligned with the Buzzer Alarm's sounding hole.
9. Attach Part 1 to Part 2 by aligning the extruded hexagons of part 2 with the 4 holes of part 1.
10. Measure the elastic string to 12 inches and cut.
11. Hot glue one end of the elastic string to one edge near the battery holder switch and the other to the opposite edge near the battery holder switch.
12. Cut off the 4 pegs on 3D printed Part 2.
13. Cut two command picture hanging strips into 4 pieces that measure .125 in x 2 in.
14. Attach two picture hanging strips to the long edges of 3D printed Part 1, one on each side.
15. Attach two picture hanging strips to the long edges of 3D printed Part 2, one on each side, placed to line up with the velcro strips on Part 1.
