puzzle cube project
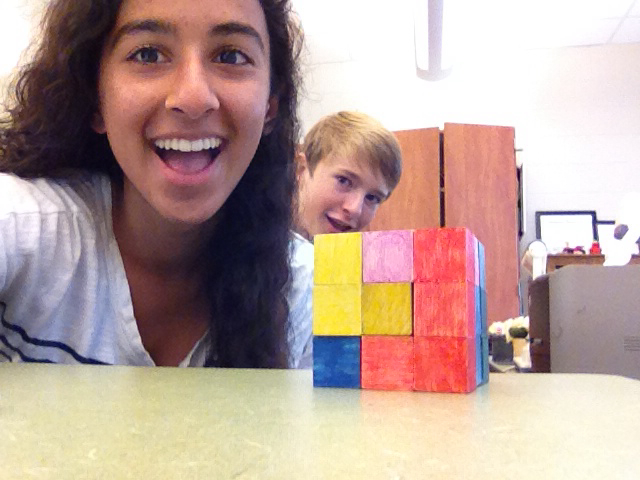
#selfie #photobomb #tyler
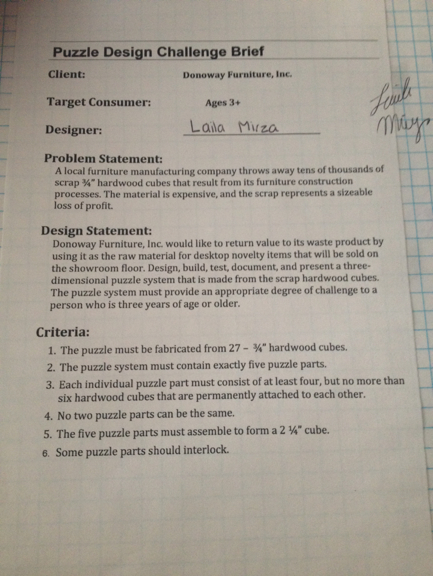
DEFINE THE PROBLEM
GENERATING CONCEPTS
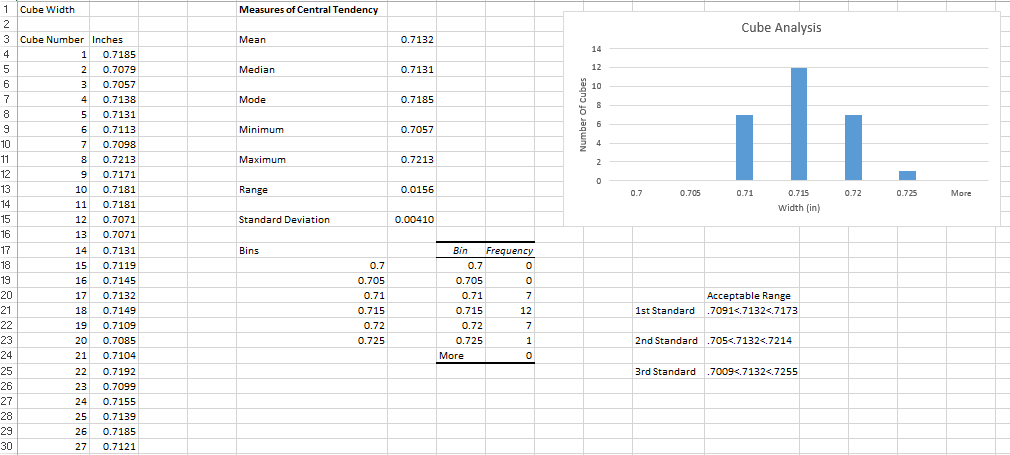
The measurements on the far left side are all of the widths of all of the cubes. In order to measure them, I used a dial caliper, which is a measuring tool that is so precise that it measures all the way down to one ten thousandths of an inch. In order to make this puzzle cube work, all of the cubes had to be roughly the same size, so that they would all fit together. If all of my cubes were 1 inch in width, and I had one that was 2 inches in width, then that cube would've made the puzzle impossible to figure out. An elephant can't fit into a tea cup, and that same idea applies here.
By looking at the measurements listed above, you can see that all of the measurements are roughly the same, and one measurement is not far from another. If I just looked at the table, I couldn't be 110% sure that all of the pieces would fit together well enough to make a puzzle cube. I had to find standard deviation. Standard deviation gives you a sense of how the data in your experiment is spread out. In this case, the standard deviation should be small. Excel can find standard deviation for you. My standard deviation was 0.00410. Using this number, I can find acceptable range. This will show me the distance in which the cube sizes should fit in. To find acceptable range, you add the standard deviation to the mean, and then subtract it from the mean to get the range, as seen above . To get the 2nd standard deviation, you would add the standard deviation to the previous maximum and subtract standard deviation from the previous minimum. You would then repeat this for the 3rd standard deviation. If any of the cubes do not fit within 3 standard deviations, than I would have taken a different cube until it fit. Luckily for me, all of my cubes fit within 3 standard deviations.
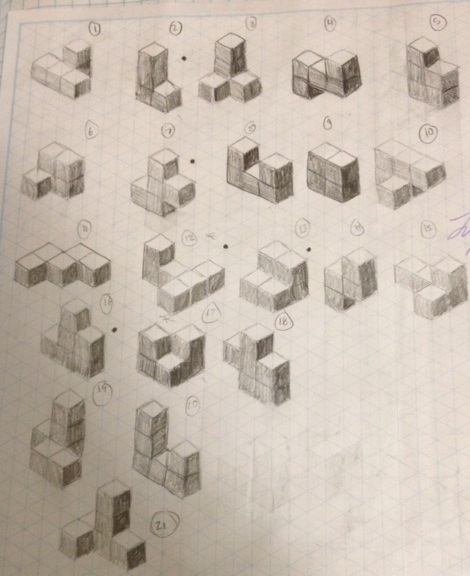
These are the 21 isometric sketches that I first made when I started the project. I used isometric sketches because these would give me a better understanding of what the piece looked like when I would begin picking pieces to assemble my puzzle cube. By brainstorming a list a possible pieces, I could then use these as guidelines when making the parts that would make up my puzzle cube. If I had tried to create my final pieces without this step, it would not have been easy and it would've been time consuming.
(Above) These are the pieces in my puzzle cube. They were made in Inventor.
DEVELOP A SOLUTION
(Above) After I figured out which pieces could make a puzzle cube, I came up with this solution.
(Above) This are the different pieces in my puzzle cube. Along with an isometric drawing of them, I also hand drew the multiviews for each one.
CONSTRUCT AND TEST A PROTOTYPE

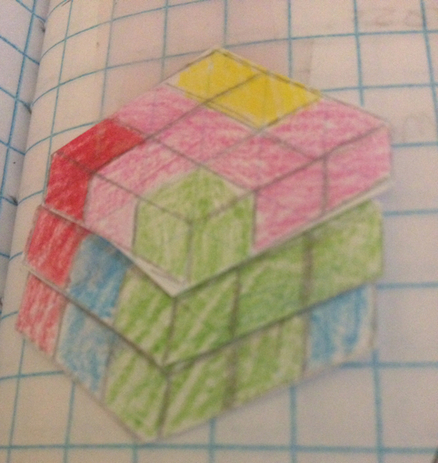
(Above) This is what my final solution for my puzzle cube looks like. (Made in Inventor)
In order to make this, I had to take away the degrees of freedom. Degrees of freedom are the different ways you can move an object. An object can move on:
1. Axis X
2. Axis Y
3. Axis Z
4. Rotate on Axis X
5. Rotate on Axis Y
6. Rotate on Axis Z
When it was time to build the puzzle cube on Inventor, I had to constrain the degrees of freedom so the parts would stay together and not move around. If I had not constrained them, then the parts would be able to move around, and they would not resemble what the completed puzzle cube looks like.
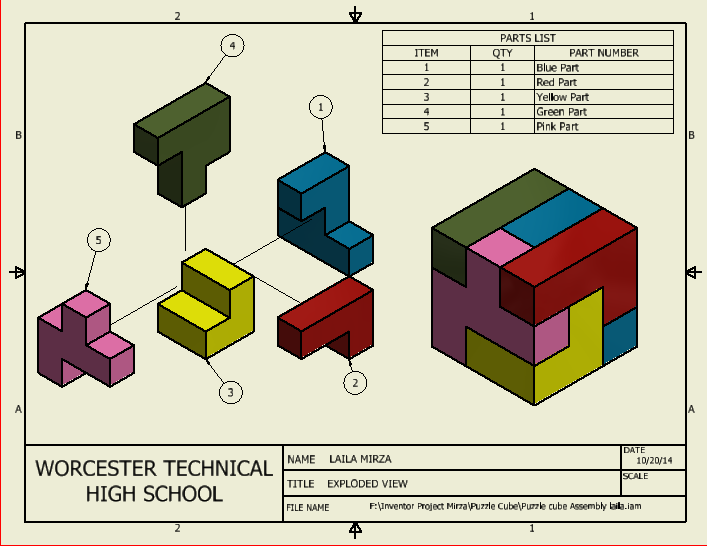
(Above) This is my final cube, what the different parts look like, how to put it together, and what the final product looks like.
EVALUATE THE SOLUTION
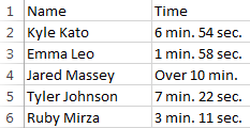
This table shows 5 different people, and how long it took them to solve my puzzle cube. As you can see, it took some people little time, and some people didn't even finish. On average, it took 5 minutes and 7 seconds. That time may not be so reliable because I had a couple of outliers, but more trials will make that average more accurate.
My cube is not meant for little kids, but rather kids my age, because it requires more focus and strategy when solving it. I would not change anything in my design because it is challenging for my peers to complete, but it is still solvable within a reasonable amount of time. An adult would not be challenged when solving it and a young kid would be too challenged when solving it. I am very proud of my puzzle cube.
PRESENT THE SOLUTION
In this project, we had to combine a lot of new information into one project. We exercised a lot of new skills that we have learned in the past few weeks, like using dial calipers, creating data in excel, and building parts in Inventor. Before this project, I may have used Excel once, and that was in elementary school, so I had to be retaught a skill. Luck for me, it was easy to pick up, and the fact that Excel could calculate almost all of the statistics was really helpful, and made it much less time consuming than it could have been. My statistics (as shown in the beginning of this webpage) helped me when it came to building pieces for the puzzle cube.
Also prior to this project, I used Autodesk Inventor once. I hated it. I didn't understand it before and I didn't know how to do things that I can do now. But now, I am super comfortable with it and I know how to use it to help me with any other project that'll come my way.
Like the last project that we did, (Cardboard Arcade) we had to follow the design process. In every other project that you do, you have to follow the design process. In this project, you couldn't make the final pieces on Inventor if you haven't found the standard deviation first. You could try, but you wouldn't be super successful.
The Cardboard Arcade project helped me understand the design process, but this project helped me understand many of the different programs that engineers use most, like excel and Inventor. It also helped me learn about why we use dial calipers, and why standard deviation and acceptable range is so important in any situation. I gained a lot of very important information in this project.
